| CaseStudyForm | |||||||||||||
|---|---|---|---|---|---|---|---|---|---|---|---|---|---|
| Title | Extended Health Clinic - With Rosters | ||||||||||||
| DateSubmitted | 6 Oct 2017 | ||||||||||||
| CaseStudyType | TeachingCaseStudy | ||||||||||||
| OperationsResearchTopics | SimulationModelling | ||||||||||||
| ApplicationAreas | Healthcare | ||||||||||||
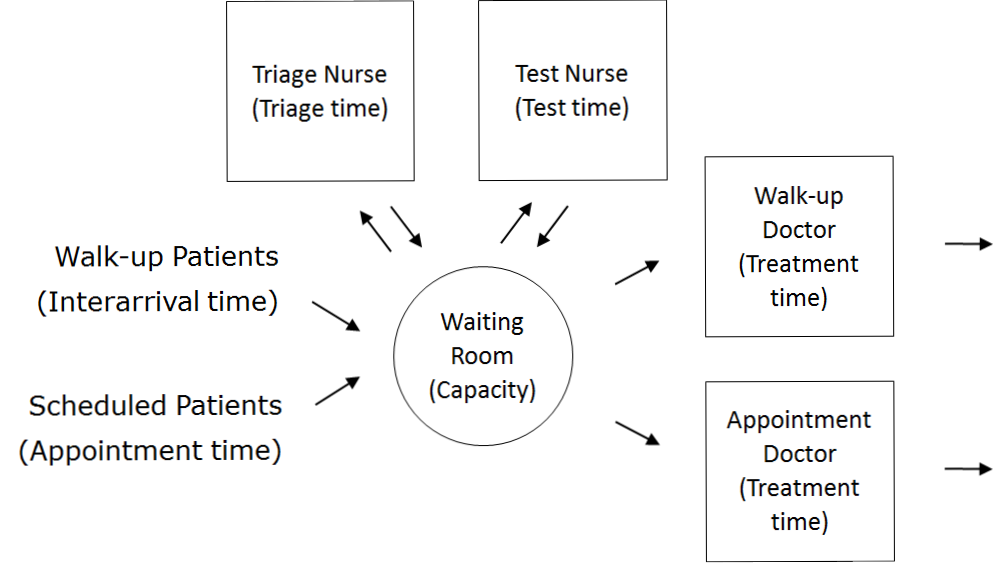
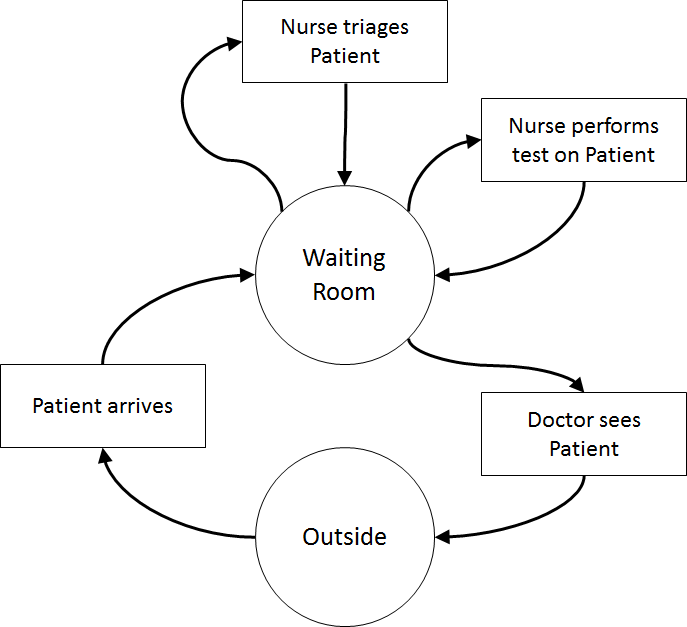
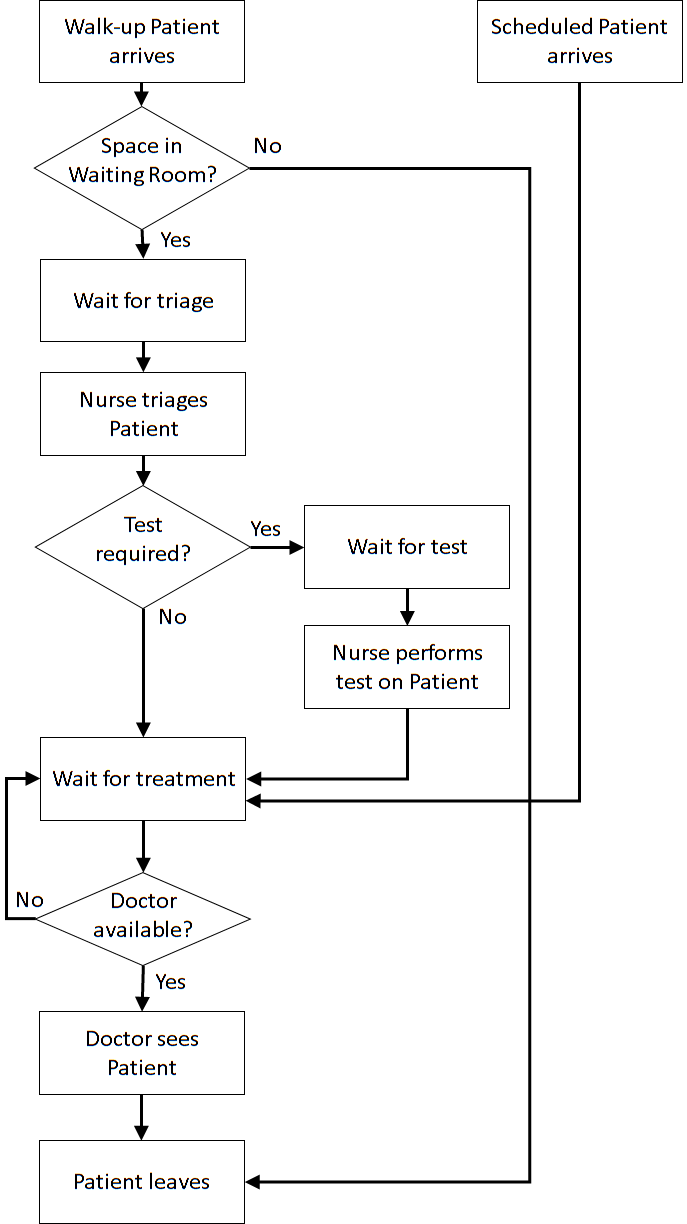
| ProblemDescription |
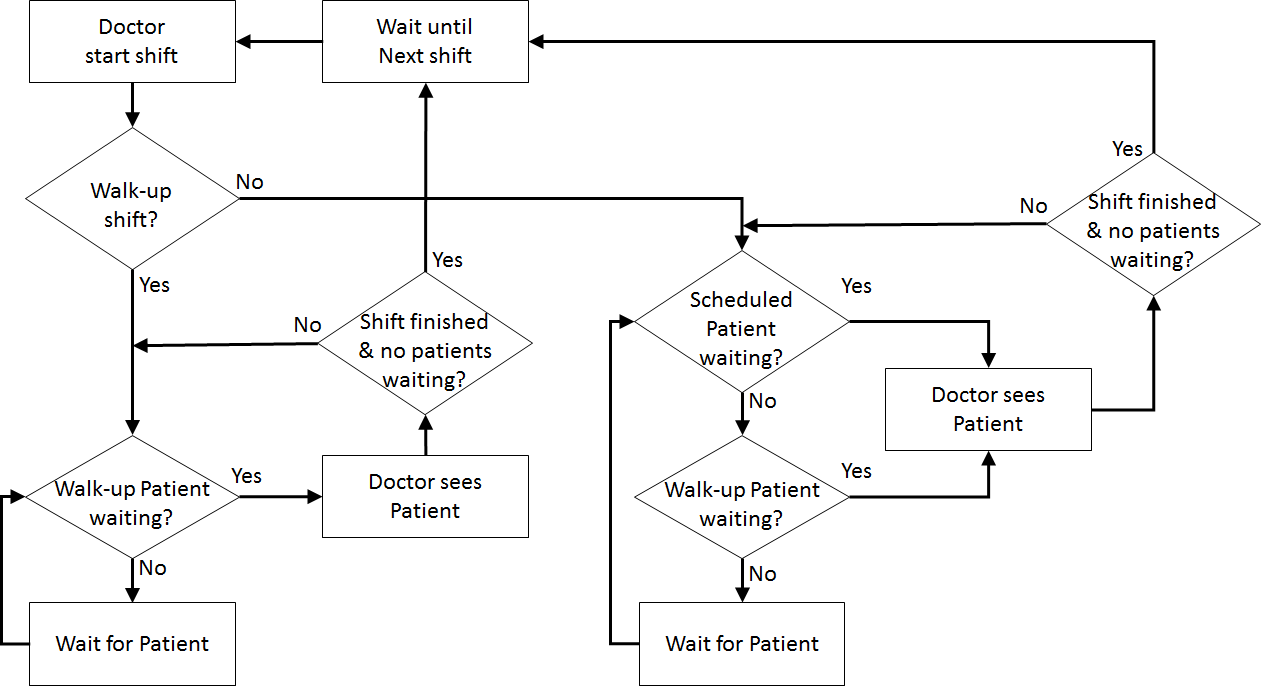
This case study extends the Extended Health Clinic model. The extension adds a roster for two doctors that assigns them to the shifts involving:
| ||||||||||||
| ProblemFormulation |
In order to formulate a simulation model we specify the following components:
 Once the content has been established (note this is usually an iterative process) we can identify the inputs:
| ||||||||||||
| ComputationalModel |
Start with the Extended Health Clinic JaamSim model.
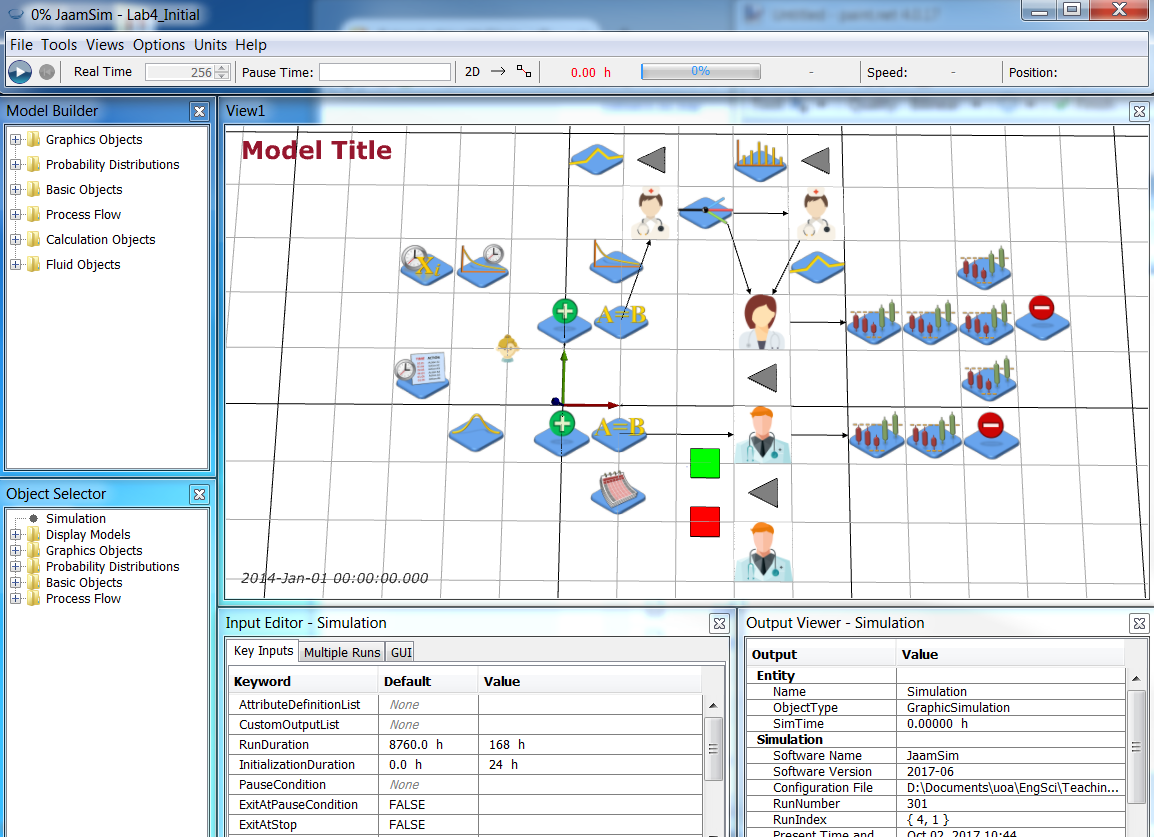 To enable the doctors to switch roles, the Server objects (that queue entities and process them one by one) need to be separated into the four distinct parts that implements a Server, namely: Resource, Seize, EntityDelay, Release.
The Resource object is used to represent a pool of identical equipment or processor units (in this case doctors). Resources can be seized and released by Seize and Release objects.
The Server object can then be modelled as a Resource with capacity one, a Seize that seizes that resource, an EntityDelay to represent the processing time, and a Release to release the resource.
However, in this example, the EntityDelay is replaced with a Server object. Strictly speaking, this is not necessary, but the Server will perform the same task as an EntityDelay since we will use the Seize and Release to control access to the Server (i.e., it won't have any queue) and it will serves the same purpose of delaying the entities for a period of time). Also, the Servers we will use have already been created (we will "repurpose them") and have useful outputs that are automatically generated, such as utilisation.
Before the new objects are created some modifications need to be made to the old model. Doctor2WalkUp, AppointmentThreshold, and WalkUpThreshold should be deleted. Note, do not delete the WalkupQueue and AppointmentQueue, we will also repurpose them later (for the Seize objects for Walk-up and Appointment patients respectively).
To enable the doctors to switch roles, the Server objects (that queue entities and process them one by one) need to be separated into the four distinct parts that implements a Server, namely: Resource, Seize, EntityDelay, Release.
The Resource object is used to represent a pool of identical equipment or processor units (in this case doctors). Resources can be seized and released by Seize and Release objects.
The Server object can then be modelled as a Resource with capacity one, a Seize that seizes that resource, an EntityDelay to represent the processing time, and a Release to release the resource.
However, in this example, the EntityDelay is replaced with a Server object. Strictly speaking, this is not necessary, but the Server will perform the same task as an EntityDelay since we will use the Seize and Release to control access to the Server (i.e., it won't have any queue) and it will serves the same purpose of delaying the entities for a period of time). Also, the Servers we will use have already been created (we will "repurpose them") and have useful outputs that are automatically generated, such as utilisation.
Before the new objects are created some modifications need to be made to the old model. Doctor2WalkUp, AppointmentThreshold, and WalkUpThreshold should be deleted. Note, do not delete the WalkupQueue and AppointmentQueue, we will also repurpose them later (for the Seize objects for Walk-up and Appointment patients respectively).
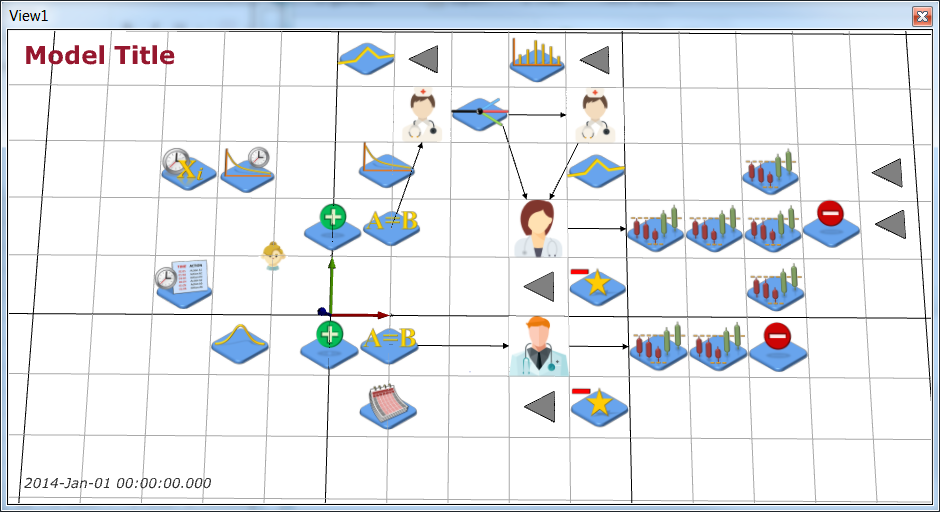
 Now rename the Doctor Server to be Doctor1 and Doctor2Appointment to be Doctor2. These Servers represent the two doctors and we will send patients to these Servers depending on what shift they are currently rostered to. First, create two new Queues Doctor1Queue and Doctor2Queue for these doctors. These queues should never be used. Next, create two Release objects (Model Builder > Process Flow > Release) that will release the Resource used by the Server once treatment has ended. Name these Release objects Doctor1Release and Doctor2Release respectively.
 Save your simulation.
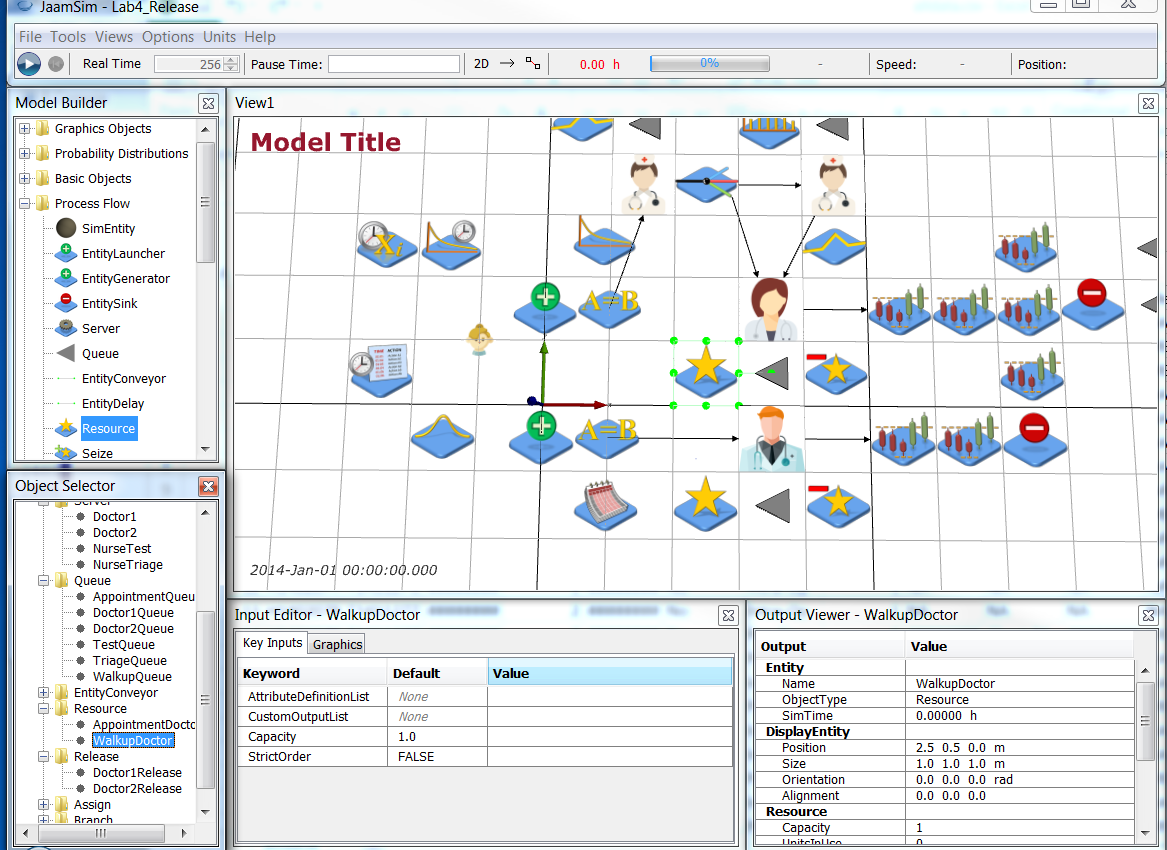
Next, we are going to create Resources to represent the (Walk-up and Appointment) shifts and create rosters for the two doctors. Add two Resources (Model Builder > Process Flow > Resource) to your model and name them AppointmentDoctor and WalkupDoctor respectively. Note that these Resources have capacity 1 by default.
Save your simulation.
Next, we are going to create Resources to represent the (Walk-up and Appointment) shifts and create rosters for the two doctors. Add two Resources (Model Builder > Process Flow > Resource) to your model and name them AppointmentDoctor and WalkupDoctor respectively. Note that these Resources have capacity 1 by default.
 Now add two TimeSeries objects (Model Builder > Basic Objects > TimeSeries) to your model and name them Doctor1Roster and Doctor2Roster respectively. These TimeSeries define if each doctor is working as the Appointment doctor or not. Configure these TimeSeries as follows
| Object | *Key Inputs *|
| Doctor1Roster | UnitType = DimensionlessUnit
Now add two TimeSeries objects (Model Builder > Basic Objects > TimeSeries) to your model and name them Doctor1Roster and Doctor2Roster respectively. These TimeSeries define if each doctor is working as the Appointment doctor or not. Configure these TimeSeries as follows
| Object | *Key Inputs *|
| Doctor1Roster | UnitType = DimensionlessUnitValue = { 0 h 1 } { 24 h 0 } CycleTime = 48 h | | Doctor2Roster | UnitType = DimensionlessUnit Value = { 0 h 0 } { 24 h 1 } CycleTime = 48 h | 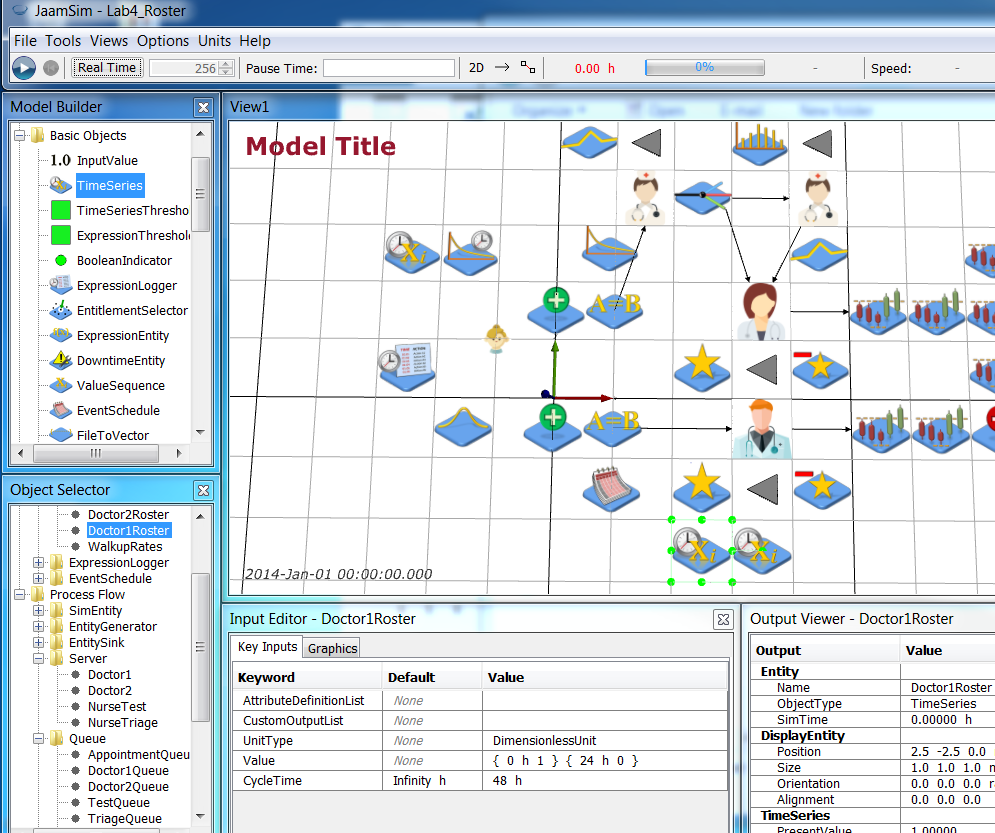 This means that Doctor1 will be the Appointment doctor for the first 24 hrs and Doctor2 will be the Appointment doctor for the next 24 hrs and this 48 hr pattern will repeat (i.e., they will alternate shifts each day).
Now reconfigure the doctor Server objects to use the new Queues, the new rosters, and send patients to the Release components. Also, we are going to generate some custom outputs
| Object | Key Inputs |
| Doctor1 | CustomOutputList = {DoctorNumber 1} {Queue [Doctor1Queue] } { IsAppointmentDoc [Doctor1Roster].PresentValue }
This means that Doctor1 will be the Appointment doctor for the first 24 hrs and Doctor2 will be the Appointment doctor for the next 24 hrs and this 48 hr pattern will repeat (i.e., they will alternate shifts each day).
Now reconfigure the doctor Server objects to use the new Queues, the new rosters, and send patients to the Release components. Also, we are going to generate some custom outputs
| Object | Key Inputs |
| Doctor1 | CustomOutputList = {DoctorNumber 1} {Queue [Doctor1Queue] } { IsAppointmentDoc [Doctor1Roster].PresentValue }NextComponent = Doctor1Release WaitQueue = Doctor1Queue | | Doctor2 | CustomOutputList = {DoctorNumber 2} {Queue [Doctor2Queue] } { IsAppointmentDoc [Doctor2Roster].PresentValue } NextComponent = Doctor2Release WaitQueue = Doctor2Queue | Save your simulation. Now that our doctor Servers are using rosters and sending patients to Release objects we need to Seize the appropriate Resource, send patients to the appropriate doctor, and then Release the Resource after the doctor has treated the patient. Add two Seize objects and call then WalkupSeize and AppointmentSeize respectively. 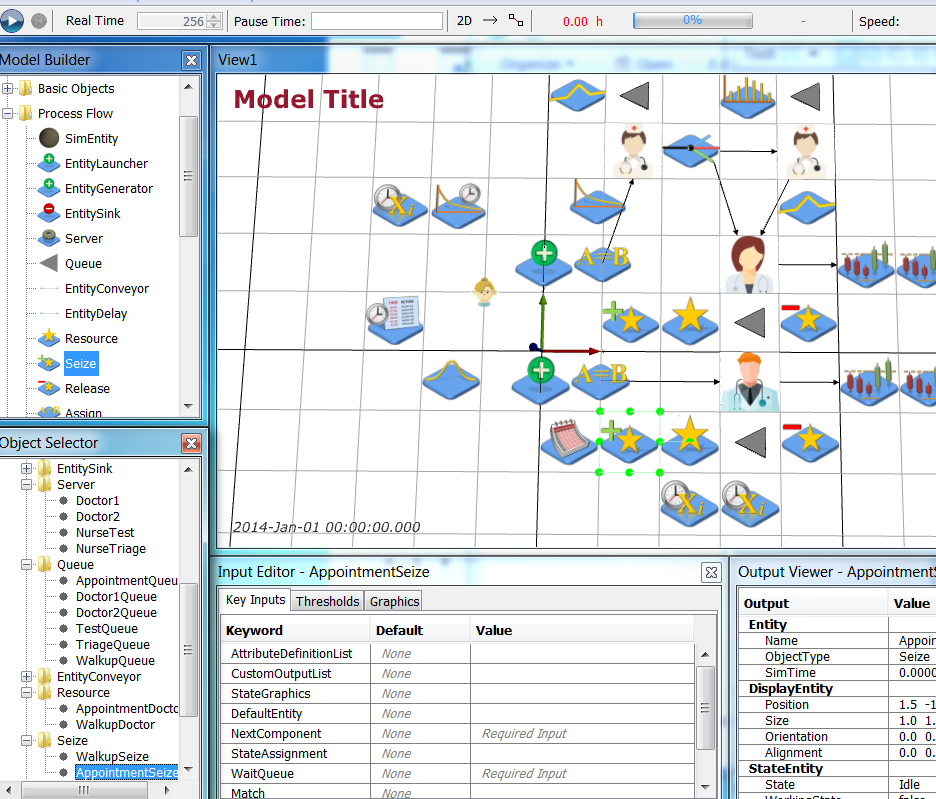 The configuration of the Seize objects is complicated and is where the majority of the logic for the doctors’ roster is implemented.
First, define a DoctorsList attribute on both Seize objects that gives the list of Servers (doctors) available to send patients to
| Object | Key Inputs |
| WalkupSeize | AttributeDefinitionList = { DoctorsList
The configuration of the Seize objects is complicated and is where the majority of the logic for the doctors’ roster is implemented.
First, define a DoctorsList attribute on both Seize objects that gives the list of Servers (doctors) available to send patients to
| Object | Key Inputs |
| WalkupSeize | AttributeDefinitionList = { DoctorsList '{[Doctor1], [Doctor2]}' } |
| AppointmentSeize | AttributeDefinitionList = { DoctorsList '{[Doctor1], [Doctor2]}' } |
Next, define a custom output NextDoc that determines which doctor in the DoctorsList to send the patient to. For Appointment patients, i.e., the AppointmentSeize, the DoctorsList is filtered to only contain those for which IsAppointmentDoc > 0 (i.e., they are the Appointment doctor) and choosing the first in the list. This can be done by using the built-in filter function with a "lambda" function that determines if an object should be included. The lambda function takes one input and is defined using two vertical lines to denote the input (in this case x) and an expression in parentheses that defines the return value of the function (in this case whether the doctor Server object is the Appointment doctor. The lambda function expression is
|x|(x.IsAppointmentDoc > 0)The filter function takes this lambda function and a list of objects (in this case the DoctorsList of the Seize object), applies the function to each object in the list and then includes or excludes it from the resulting list (returned from the filter function accordingly). The NextDoc definition is | Object | *Key Inputs *| | AppointmentSeize | CustomOutputList = { NextDoc 'AppointmentDoc = filter(|x|(x.IsAppointmentDoc > 0), this.DoctorsList); AppointmentDoc(1)' } |
This expression creates the AppointmentDoc list by looking at each x in this.DoctorsList (i.e., the DoctorsList for the AppointmentSeize), and including them in the AppointmentDoc list if their IsAppointmentDoc custom output is > 0 (set by the rosters). Once the list has been created, then NextDoc is set to the first object in the list.
For Walk-Up patients the logic is more complicated. In order to use both doctors in the roster in the right order, i.e., Walk-Up doctor first then Appointment doctor if free, we sort the DoctorsList using the built-in sort function that takes as input a lambda function (similar to the lambda function for filter), but with two inputs. This lambda function put the objects in order x then y is the function returns true and y then x if function return false. The lambda function in this model looks at the the doctor Servers in DoctorsList and puts the Appointment doctor last (by putting y last if y is the Appointment doctor or x last if y is not).
|x, y|(y.IsAppointmentDoc > x.IsAppointmentDoc)The sort function then applies this lambda function to sort the DoctorsList to create a WalkupDocs list WalkupDocs = sort(|x, y|(y.IsAppointmentDoc > x.IsAppointmentDoc), this.DoctorsList)The WalkupDocs list is then filtered to create a list of AvailableDocs (similar to the filtering for the AppointmentSeize object) that only includes those doctor Server objects which aren’t treating patients or that have patients waiting AvailableDocs = filter(|x|(x.NumberInProgress + x.Queue.QueueLength == 0), WalkupDocs)Note that x.Queue.QueueLength should always be zero, but JaamSim does queue patients at the doctor Servers (for zero time) before moving them into processing. Depending on the order conditional calculations are performed internally x.NumberInProgress may be 0 and x.Queue.QueueLength may be 1, hence the expression used. Finally, the first available doctor is selected for NextDoc, but WalkupSeize is sometimes checked when both doctors are treating patents, so AvailableDocs may be empty. We use a conditional statement to assign the first doctor in DoctorsList if the AvailableDocs list is empty (although the Seize will not be used by a PatientEntity as no doctor is available - so the WalkupDoctor Resource is currently utilised) size(AvailableDocs) > 0 ? AvailableDocs(1) : this.DoctorsList(1)The final expression in its entirety is | Object | *Key Inputs *| | WalkupSeize | CustomOutputList = { NextDoc 'WalkupDocs = sort(|x, y|(y.IsAppointmentDoc > x.IsAppointmentDoc), this.DoctorsList); AvailableDocs = filter(|x|(x.NumberInProgress + x.Queue.QueueLength == 0), WalkupDocs); size(AvailableDocs) > 0 ? AvailableDocs(1) : this.DoctorsList(1)' } |
Now we need to define which Resource gets seized and which Queue is used if no Resource is available
| Object | Key Inputs |
| WalkupSeize | WaitQueue = WalkupQueueResourceList = AppointmentDoctor WalkupDoctor NumberOfUnits = { this.NextDoc.IsAppointmentDoc } { '1 - this.NextDoc.IsAppointmentDoc' } |
| AppointmentSeize | WaitQueue = AppointmentQueueResourceList = AppointmentDoctor WalkupDoctor NumberOfUnits = { 1 } { 0 } | From the Seize objects patients go to Assign and Branch objects to send patients to the right doctor. We will work backwards from the doctor Servers. First, add a Branch object and call it! BranchDoctor. Configure it to send patients to either Doctor1 or Doctor2 depending on which doctor they were assigned to | Object | Key Inputs | | BranchDoctor | NextComponentList = Doctor1 Doctor2 Choice = this.obj.Doctor | Next, add two Assign objects and call them AssignWalkupDoctor and AssignAppointmentDoctor respectively. Both Assign objects send the patients to BranchDoctor next and use outputs from the Seize objects to define which doctor to go to and which type of doctor was seized. You also need to add the Doctor attribute to your PatientEntity so patients can keep track of the doctor they are assigned to for treatment and the doctor type Resource they seized. | Object | Key Inputs | | AssignWalkupDoctor | AttributeAssignmentList = { 'this.obj.Doctor = [WalkupSeize].NextDoc.DoctorNumber' } { 'this.obj.SeizedDocs = [WalkupSeize].SeizedUnits' }NextComponent = BranchDoctor | | AssignAppointmentDoctor | AttributeAssignmentList = { 'this.obj.Doctor = [AppointmentSeize].NextDoc.DoctorNumber' } { 'this.obj.SeizedDocs = [AppointmentSeize].SeizedUnits' }NextComponent = BranchDoctor | | PatientEntity | AttributeDefinitionList = { PatientType "" } { Test 0 } { Doctor 0 } { SeizedDocs '{ 0, 0 }' } |
We also need to use a Branch object to route the patients to the appropriate "leaving" conveyor. Add a Branch object named BranchLeave and configure it to route patients to leave as a Walk-Up patient or Appointment patient respectively.
| Object | Key Inputs |
| BranchLeave | NextComponentList = TreatToLeave TreatToLeave2Choice = 'this.obj.PatientType == "Walkup" ? 1 : 2' |
Save your simulation.
Next we will make sure that the patient flow is correct for the new Seize-Release structure and that Resources are being released properly.
| Object | Key Inputs |
| TriageToDoctor | NextComponent = WalkupSeize |
| TestToDoctor | NextComponent = WalkupSeize |
| ArriveToTreat2 | NextComponent = AppointmentSeize |
| WalkupSeize | NextComponent = AssignWalkupDoctor |
| AppointmentSeize | NextComponent = AssignAppointmentDoctor |
| Doctor1Release | Resource = AppointmentDoctor WalkupDoctorNumberOfUnits = { this.obj.SeizedDocs(1) } { this.obj.SeizedDocs(2) } NextComponent = BranchLeave | | Doctor2Release | Resource = AppointmentDoctor WalkupDoctor NumberOfUnits = { this.obj.SeizedDocs(1) } { this.obj.SeizedDocs(2) } NextComponent = BranchLeave | You may like to reorganise your layout at this point! Note to get labels on objects, select the object, right click and choose Show Label. You can then select the label and (holding Ctrl down) move it relative to the object to make your layout diagram "look nice". 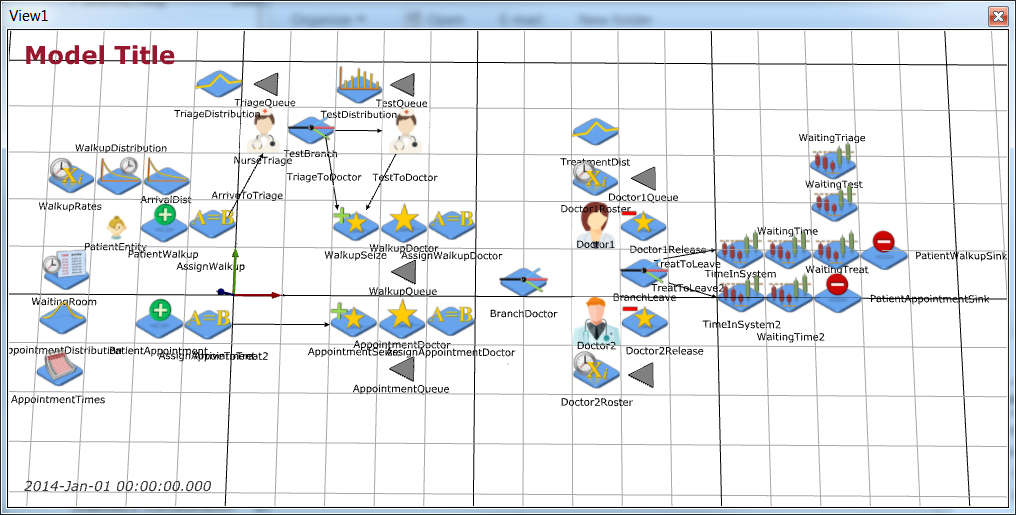
| ||||||||||||
| Results |
Note that JaamSim has probably complained about your RunOutputList as we have changed a lot of components in our model and this value (Object Selector > Simulation > Key Inputs > RunOutputList) may be empty at this point. Edit the Simulation Key Inputs to get the outputs we want, the only changes are to change [Doctor].Utilisation to [Doctor1].Utilisation and '[Doctor2Appointment].Utilisation + [Doctor2Walkup].Utilisation' to [Doctor2].Utilisation.
| Object | Key Inputs |
| Simulation | UnitTypeList = DimensionlessUnit TimeUnit TimeUnit TimeUnit TimeUnit TimeUnit DimensionlessUnit DimensionlessUnit TimeUnit TimeUnit DimensionlessUnit DimensionlessUnitRunOutputList = { [Simulation].RunIndex(1) } { [WaitingTriage].SampleAverage } { [WaitingTest].SampleAverage } { [WaitingTreat].SampleAverage } { [WaitingTime].SampleAverage } { [TimeInSystem].SampleAverage } { '[TriageQueue].QueueLengthAverage + [TestQueue].QueueLengthAverage + [WalkupQueue].QueueLengthAverage' }{ [Doctor1].Utilisation } { [WaitingTime2].SampleAverage } { [TimeInSystem2].SampleAverage } { [AppointmentQueue].QueueLengthAverage } { [Doctor2].Utilisation } |
Save your simulation.
As in the Extended Health Clinic case study, perform 100 runs of this simulation each 168 hours long and with 24 hours warm up to examine the effect of the changes to the health clinic and observe the difference in average time in system and queue length for the walk up and appointment patients, and the difference in utilisation of the walk up only doctor and the appointment and walk up doctor. No changes to the Simulation object's Key Inputs other than those described earlier in this case study are needed. The Simulation runs are as follows:
| Object | Multiple Runs | Value |
| Simulation | RunIndexDefinitionList | 4 100 |
| | StartingRunNumber | 4-1 |
| | EndingRunNumber | 4-100 |
Run your simulation and modify Lab4Analysis.R to use your .dat file. Your results should be as below.
                        ConfLower       Mean           ConfUpper
WalkUp.WaitingTriage     0.063607       0.066832        0.070057
WalkUp.WaitingTest       0.001793       0.001953        0.002113
WalkUp.WaitingTreat      0.127544       0.135612        0.143679
WalkUp.WaitingTime       0.194155       0.204397        0.214640
WalkUp.TimeInSystem       0.709928       0.720624        0.731319
Num.WalkUps.Waiting      0.469415       0.497684        0.525952
Doctor1.Utilisation      0.641166       0.645107        0.649047
Appointment.WaitingTime  0.194093       0.200859        0.207624
Appointment.TimeInSystem 0.476982       0.484046        0.491111
Appointment.Queue        0.572599       0.593162        0.613724
Doctor2.Utilisation      0.692690       0.696761        0.700831
| ||||||||||||
| Conclusions | In this case study, you extended the Extended Health Clinic model to use a roster for the doctors in order to try and balance workload. You investigated the effect of this change to the quality of care of the patients (their experience was the same as before) as well as the workload of the doctors. The workload seems fairly (but not exactly) balanced over 168 hrs. | ||||||||||||
| ExtraForExperts | |||||||||||||
| StudentTasks | |||||||||||||


| I | Attachment | History | Action | Size | Date | Who | Comment |
|---|---|---|---|---|---|---|---|
| |
Lab4Analysis.R | r1 | manage | 1.2 K | 2017-10-08 - 09:26 | MichaelOSullivan |
Topic revision: r8 - 2019-10-07 - MichaelOSullivan

Ideas, requests, problems regarding TWiki? Send feedback